
#
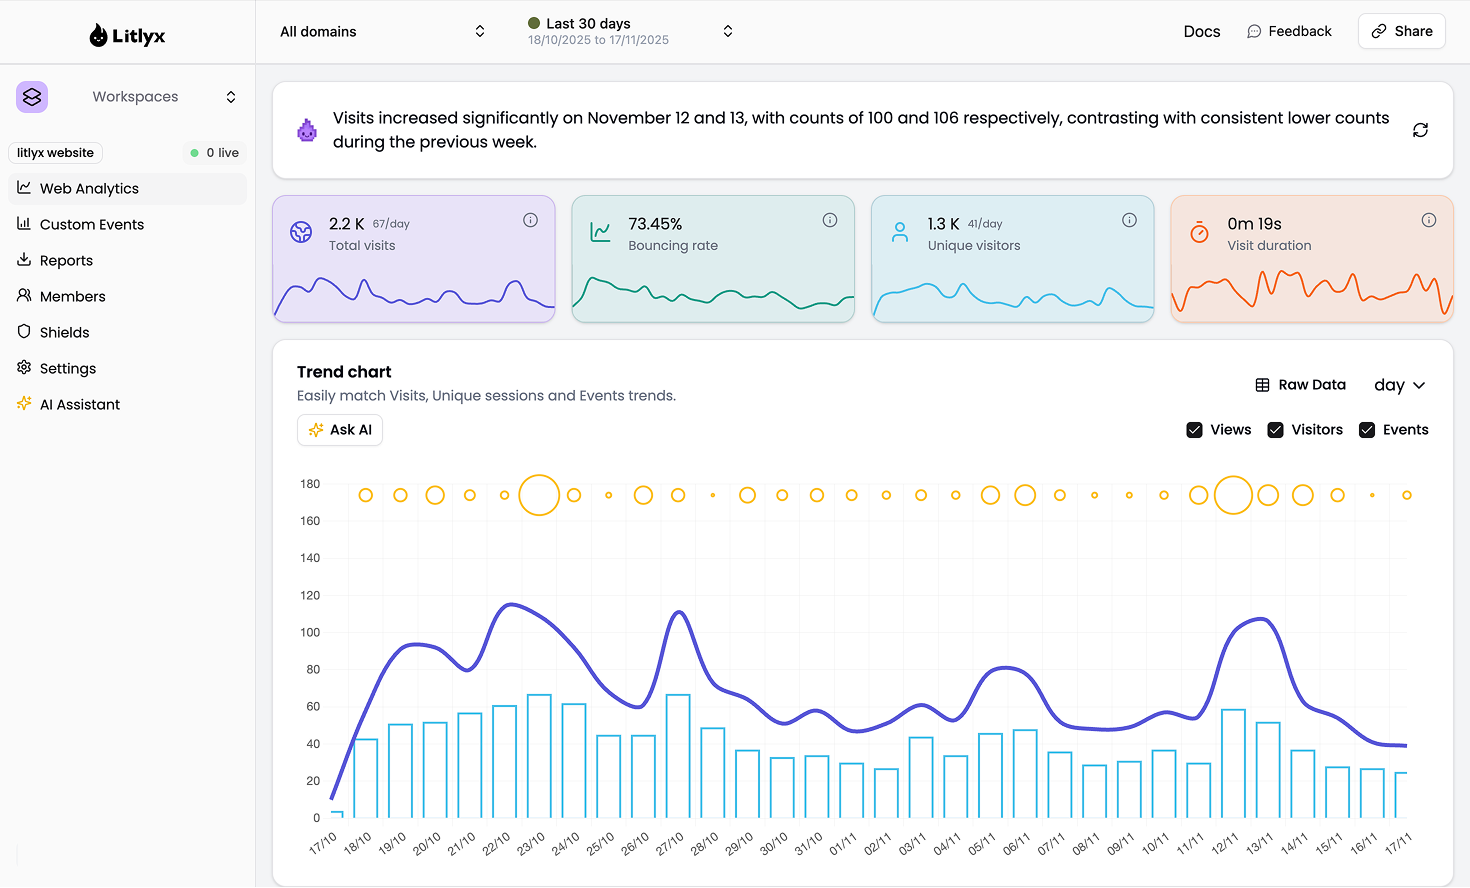
Litlys is the easiest analytics tool you will ever use. It is fast, modern and completely cookie free.
Install in under 30 seconds. Self host with Docker or use our hosted cloud.
A powerful alternative to Google Analytics 4, Posthog and Mixpanel.
#
#
## Get Started on our Cloud Version
Sign up on [Litlyx.com](https://dashboard.litlyx.com) and create a project. Then use your `workspace_id` to connect Litlyx to your website.
## Universal Installation
```html
```
This minimal setup is all you need to start tracking visitors on your website or web apps with ease.
# Intergrate with everything
You can install Litlyx using `npm`, `pnpm` or any modern package managers:
```sh
npm i litlyx-js
```
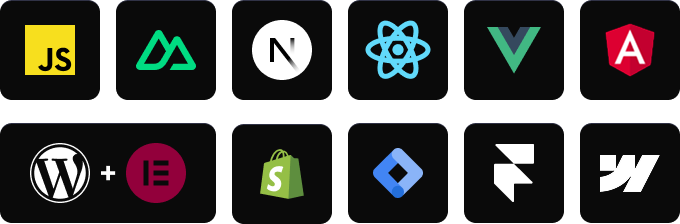
Litlyx works with all modern JavaScript and TypeScript frameworks. You can also use Litlyx on any WordPress website by injecting the script with a third party plugin.
# Import using a package manager
First, import the litlyx-js library:
```js
import { Lit } from 'litlyx-js';
```
Then initialize Litlyx:
```js
Lit.init('your_workspace_id');
```
Once initialized, Litlyx automatically tracks page visits, real time users, unique visitors and much more.
# Track Custom Events
You can track your own custom events with Litlyx.
```js
Lit.event('click_on_buy_item');
```
If you need more detailed information, you can add `metadata`:
```js
Lit.event('click_on_buy_item', {
metadata: {
'product-name': 'Coca-Cola',
'price': 1.50,
'currency': 'EUR'
}
});
```
Litlyx makes it easy to adapt your analytics to your project.
# Fire Your First Event with cURL
Use the command below to send a test event. Replace `workspace_id` with your project ID.
```bash
curl -X POST "https://broker.litlyx.com/event" \
-H "Content-Type: application/json" \
-d '{
"pid": "workspace_id",
"name": "testEvent1",
"metadata": "{\"test\": \"something\"}",
"website": "something",
"userAgent": "something"
}'
```
# Self-hosting with docker
To self host the Litlyx dashboard, first clone this repository. Litlyx Docker images are hosted on DockerHub.
Run the following commands in order:
```bash
npm run docker-prepare #use your favourite package manager like pnpm, bun, etc...
```
and than:
```bash
docker-compose up
```
At localhost:3000 you will see your own instance of the Litlyx dashboard.
## Forward data to your self-hosted instance with script tag
To forward your data on your self-hosted instance, you need to set up the following variables: `data-host`, `data-port`, `data-secure`(`true` if it is HTTPS or `false` if it is HTTP).
```html
```
# Unlock the full power of Litlyx self hosting
Litlyx self hosting gives you the freedom to use the full platform for free.
If you want to scale to more client seats, you can choose one of our lifetime plans available in the [pricing](https://litlyx.com/pricing) section.
# Read our docs
For more info on how to use litlyx read our [documentation](https://docs.litlyx.com).
# Stay updated with our roadmap
To keep track on what we are cooking behind the scene we have a public [Roadmap](https://litlyx.com/roadmap) for you to check.
# Join discord
If you need more information, want to interact with us or the community, need help, or have feedback to share, feel free to join us on Litlyx's [Discord](https://discord.gg/9cQykjsmWX) channel.
# Contribution
If you want to contribute to Litlyx's development, reach out to us on [Discord](https://discord.gg/9cQykjsmWX) in our `#contribution` channel.
### Thank you!
 # Support or Business Inquiries
For any support, write to help@litlyx.com. We are happy to assist you.
# License
Litlyx is licensed under the [Apache 2.0](/LICENSE) license.
# Support or Business Inquiries
For any support, write to help@litlyx.com. We are happy to assist you.
# License
Litlyx is licensed under the [Apache 2.0](/LICENSE) license.